Timelapse Tutorial
Using the D.I.G. Uploader to create time-lapse movements!
1. Preparation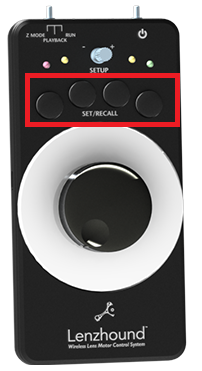
To set up a time-lapse movement using your Lenzhound device you will need
- Both the the RTX-1 Controller and DB-1 unit of the Lenzhound System with the
latest v1 firmware. - USB to mini-USB cable
- Lenzhound D.I.G. Uploader
2. Set up starting and ending points
- Ensure that your both devices are powered on and that your RTX-1 is in Free Run mode using the switch on the upper left corner of your RTX-1. If you have not calibrated your device, do that at this point.
- Using the main knob, move your lens to the position you would like to begin your time lapse movement.
- The highlighted buttons in the image above can be used to remember a position and easily send the lens back to that position when pressed again in Playback Mode. The buttons are referred to as Recall button 1-4, numbered from left to right.
- For this tutorial we are going to used Recall button 1 as our starting point. Hit this button to save the starting position.
- Using the main knob again, navigate to the ending position of your move and hit Recall button 2 record the ending point.
3. Verify your positions in playback mode
- Using the switch on the upper left corner, change your system into Playback mode. This will allow you to recall saved positions, which is very useful for creating consistent lens motions.
- Press Recall button 1 to ensure that the lens returns to the intended position.
- Repeat for Recall button 2. Repeat step 2 if necessary.
4. Connect to your computer
- Using your mini-USB cable, connect your RTX-1 Controller to your computer.
- Open the Lenzhound D.I.G. Uploader, your interface should look very similar to the image below.
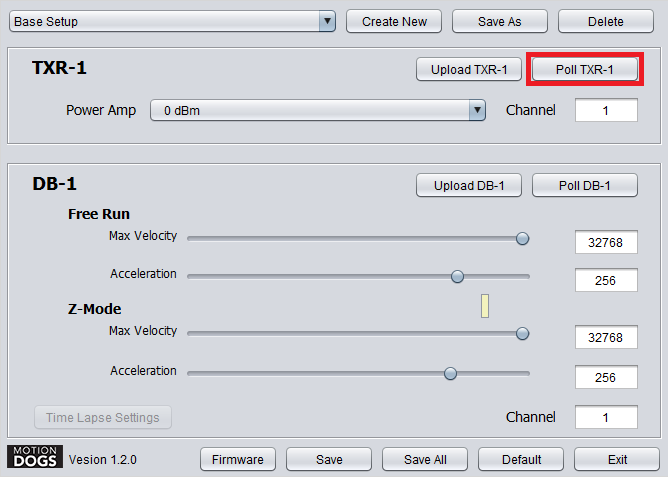
5. Poll the saved positions
- Click the button highlighted in the image above. The application will ask you if you would like to overwrite the settings you are currently working with or create a new setting profile. For the purpose of this tutorial, either will work, however you may wish to create a new profile if you would like to maintain the settings you were previously working with.
6. Run the utility
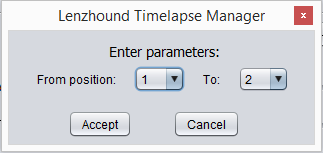
- Click the Time Lapse Settings button in the lower left corner of the DIG Uploader
- Choose the correct starting and ending position as shown to the left and click Accept.
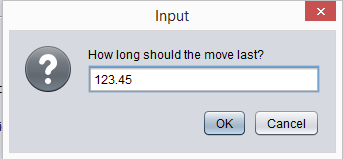 Enter the desired duration for the entire move. Decimal values are perfectly valid in this case. Hit OK when you are ready to continue.
7. Upload new settings back onto the RTX-1 Controller
- The process so far should have changed the Velocity and Acceleration values for free run mode in the application, so all we need to do now is upload those settings into the motor. Connect the DB-1 unit to your computer using your mini-USB cable.
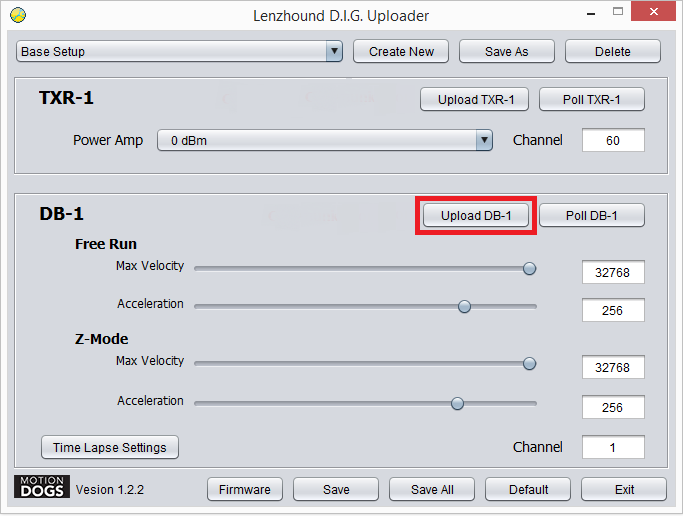
- Click the Upload DB-1 button shown above.
- You're finished, great work!
To start the move, press the saved position button you'd like to move to on your RTX-1.