Contents:
Getting Started
Follow Focus Operation
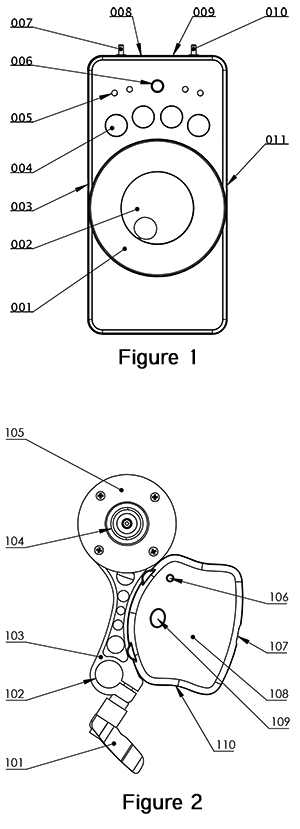
The RTX-1 Remote Transmitter (Fig. 1) operates the lens motor via a wireless RF (radio frequency) signal on the 2.4GHz band. The system may be operated on any of 81 RF channels in this band. The factory default channel is 01 (or 2.401GHz.) To change the RF channel, use the Lenzhound Leash desktop application (see below).
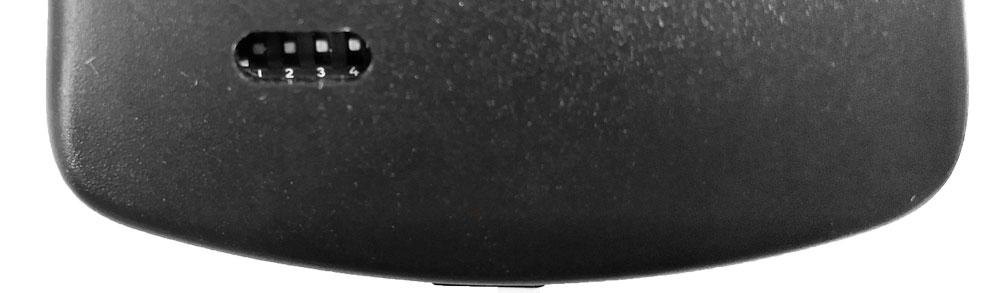
The DB-1 Receiver/Motor Unit (Fig. 2) mounts up to your camera’s rod support system. The Basic Lenzhound system is designed to control the manual focus ring on a camera lens by means of a 6mm drive belt. Four standard size belts are available to accommodate an array of lenses. There is also a cinema gear option available.
The Main Focus Knob (002) controls rotation of the motor after being calibrated to the close and far focus points of the lens. Calibration mode is entered on power-up of the RTX-1 or, to re-enter calibration after normal operation, by holding down the Rotary Encoder Button (006 ) for three seconds.
- This system will work with most DSLR lenses that have a manual lens ring.
- For single user operation, an optional thumbwheel extension is available.
- A 32-pitch gear system (Cine-standard System) is also available
Mount Motor Unit on the Camera
Slide the Rod Mount Clamp (102) onto your camera’s standard rod system and secure the clamp. The DB-1 Pulley (104) must be properly aligned with the lens ring you want to control. Place the drive belt around the lens and pulley. Tension the belt to get approximately 5 mm of deflection when pressing lightly with your finger.
NOTE: Power up both the Transmitter and Receiver before tensioning belt.
Battery Installation and Connection
RTX-1 Remote Transmitter
Open the battery hatch on the back side of the Lenzhound controller unit and install four AAA batteries. Flip the power switch (010) to on. The pwr LED (009) signals that the unit is powered on.
DB-1 Motor/Receiver Unit
Plug one end of the DC power cable into the power Jack on the DB-1 and the other into the 12V battery (optional accessory) or another compatible 12VDC power source on your camera rig. Securely attach the 12-Volt Lithium battery pack to your camera rig. We recommend a hook and loop style (i.e. Velcro) strap system but there are a number of options available for the indie filmmaker. Turn the power switch on. Allow approximately 8 seconds for each unit to boot up.
NOTE: Test that the motor responds to movement of the encoder knob and then tighten drive belt.
Calibrating the Lenzhound
Calibration is achieved by moving the motor with the rotary encoder to set the close and far range limits of the lens.
New out of the box, a small range of motion has been pre-calibrated by default. To calibrate to your particular lens, double-tap on the encoder and it will then turn solid red to indicate the first end-position is ready to be set.
To set the first end-position of the lens, dial the encoder knob until the desired motor position is achieved and press the encoder button. The encoder will quickly flash orange, indicating the second end-point can be entered. Again dial the encoder knob until the opposite end-position is obtained and again press the button. The encoder will flash orange and the system exits the calibration state. During calibration, the three position Mode Switch (007 in Fig. 2) functions as a speed multiplier, allowing the motor to be moved faster or slower with the encoder knob.
Successful calibration effectively maps the desired lens movement range to the full range of the main focus knob. If desired, the motor direction may be reversed, relative to the main knob direction, by calibrating the near and far focus points in reverse order.
Free Run
After calibration, operation of the lens ring with the main focus knob is achieved by placing the unit in Free Run mode. Flip the mode toggle switch to the right, i.e. the Run position.
Basic follow focus operation lives and breathes in free run. Pulling focus is an art and a science. A remote video monitor is considered essential, but in the days before video it was often accomplished using the lens markings alone. A good focus puller is good at judging distances and will use all methods available for assistance.
The Marking Disk (001) can be marked with grease pencil or white-board markers. It is useful for noting both a specific mark that an on-camera subject will hit on the set and/or, for the full range of transcribed distance markings from the barrel of the lens.
While in Free Run mode, up to four specific focus knob positions may be stored (set) in memory by pressing any of the four Set/Recall Buttons (004).
Control the motor speed from 1% to 100% of the maximum speed set for the active profile selected in Z-mode (first profile is used as default on start-up).
Playback
A stored memory position that is "Set" in Run mode, may be recalled in Playback Mode. In this mode any of the four recall buttons can be pressed in any order and the motor will immediately move to that position.
The motor speed can be adjusted in playback mode by dialing the encoder knob to the left or right. The bank of 4 LEDs on the top of the controller help provide feedback as you dial speed settings. The far left LED (red) will light to signal you have reached the slowest playback speed, and the far right LED (green) shows you have reached the fastest playback speed.
The speed may be changed either before pressing a recall button or while the motor is in motion. The motor speed responds in real time. When entering playback mode, the encoder LED illuminates yellow, indicating playback speed is mid-way at 50%.
Z-Mode
Z-mode functions as a bank of four profiles that are activated with each of the four recall buttons. An LED will pulse as a reminder which profile is currently active.
Speed and acceleration settings are saved per profile which can be changed by turning the rotary encoder. The LED lights function similar to Free Run and Playback Mode, 1% is solid RED on the left, 50% is orange in the middle, and 100% is solid green on the right. More precise values can be set using the Lenzhound Leash.
Press the rotary encoder one short press to quickly toggle between setting acceleration and speed. This might sound confusing but just play around with it a bit; having these settings handy provides an amazing level of flexibility.
Motor Power and Micro-stepping Settings for 3XT Upgrade
Systems purchased prior to 11/25/17 please see motor settings in our v1 Getting Started Guide.
A system with the 3XT upgrade (shipped standard since Nov., 2017) has a new port to access a set of four DIP switches. The original set of two DIP switches (oval port) is bypassed for 3XT operation.
The array of 4 DIP switches, accessed through the slot on the receiver box face, provides access to a range of power and motor speed settings (micro-stepping settings). All 3XT systems are shipped in 1/8 micro-stepping mode at 100% current. Reducing the current level may result in quieter operation while sacrificing torque.
IMPORTANT: Setting switch 1 (M0A) and switch 2 (M0B) BOTH to the ON state will disable the control board. Make sure that DIP switches 1 and 2 are never both switched ON together or your system will not power up.
| STEP-MODE | Switch 1 (M0A) | Switch 2 (M0B) | Switch 3 (M1) |
| Full Steps (fastest, least smooth) | ON | OFF | OFF |
| Non-circular Half Steps (provides increased torque at higher RPM's compared to the standard 1/2 step mode) |
OFF | ON | OFF |
| 1/2 Steps | ON | OFF | ON |
| 1/4 Steps | OFF | ON | ON |
| 1/8 Steps (factory default) | OFF | OFF | OFF |
| 1/16 Steps (slowest, smoothest) | OFF | OFF | ON |
| CURRENT LEVEL | Switch 4 (TRQ0) | Lenzhound Leash Reduction Checkbox |
| 100% (factory default) | OFF | Unchecked |
| 75% | ON | Unchecked |
| 50% | OFF | Checked |
| 25% | ON | Checked |
Changing Settings with the Lenzhound Leash
 The Lenzhound Leash is available for Windows and Mac OS. This is a graphical utility enabling you to change settings and upgrade firmware. Download it here.
Windows Installation Notes:
Extract files from zip, double click on Lenzhound Leash.exe to start the application.
Mac Installation Notes:
Download the file and follow the prompt to drag the icon over the application folder icon in the installer window. Then navigate to your applications folder, right click on the Lenzhound icon and choose open. It will try to verify and tell you it's an unrecognized developer. Say open anyway.
Basic Usage
To use the Lenzhound Leash, connect only one device at a time to a computer with the USB cable - either the RTX-1 controller or DB-1 motor. If you have the RTX-1 connected it will display different settings than if you plug in the DB-1. Do not connect them both to your computer at the same time.
Profiles
Profiles are only displayed and available when the RTX-1 is connected. Save motor speed, acceleration, and current level settings to a profile. These settings can be restored by pressing one of the four recall buttons on the RTX-1 controller while in Z-mode.
Channel
Change the wireless channel. The RTX-1 and DB-1 must be on the same RF channel to communicate. Connect the units to the leash one at a time and set to the desired channel.
Start in Calibration Mode
This option is only available for the RTX-1. If this checkbox is selected, the RTX-1 will start in calibration mode and require lens calibration every time the power is cycled.
Updating Firmware
Update both the controller and receiver by plugging in the USB cable while the App is open.
Follow the prompts to plug in the controller and then the motor unit via the mini USB cable provided with your Lenzhound.
Rolling Back
In case you'd like to revert back to the current stable v1 build, there is an option in the Tools menu in your application menu bar click "Reset to stable version".
What's New in v2
Here are some key operational differences with v2.x firmware, (standard since Nov, 2017):
- To enter calibrate, it is now a double-tap on the encoder instead of a long press. Actual calibration procedure is as before.
- A single press on the encoder will toggle back and forth between motor speed (dim reddish LED) and acceleration (dim greenish LED) (this works the same for free run, playback and z-mode)
- Z-mode now functions as a bank of four profiles that are activated with each of the four recall buttons. Speed and acceleration settings are saved per profile. This is very handy for saving and accessing different speed/acceleration combos. The LED lights, same as before, function as a scale from slow to fast. However, while in z-mode, you will also see the LED for the current profile will pulse slowly as a reminder of what profile is active.
We recommend having slower speed combos on the left buttons and faster on the right. This way the lights line up better.
Future updates will be very easy now that the software/ firmware has an entirely new architecture, and feature revisions will be much better on the development side.
Remember, same as ever, the motor has the most torque at slower motor speed settings and when you find the limit of how fast it can move the lens (most often at a slight stiff spot in the lens) the motor will "slip." It may make an uncomfortable noise, but nothing is amiss with the gear train, shaft or lens, it is only the backlash as the electromagnetic pulse moves on, while the motor doesn't. Just back off on speed and you're set.
Also, when/if this happens, there is no need to start all over with calibration. The range is still correct, it's just the alignment of that range with respect to the lens that's off. To re-align, just move the main focus knob to the short side of travel (i.e. NOT the side where you over-run the hard-stop of the lens) and wait three seconds for the motor to fall asleep (regular power conservation mode.) While it's asleep, you can manually align by rotating the motor/gear to the correct end stop on the lens barrel and you're on your way again.x