Getting Started
Follow Focus Operation
The RTX-1 Remote Transmitter (Fig. 1) operates the lens motor via a wireless signal on the 2.4GHz band. The system may be operated on any of 81 channels in this band. The factory default channel is 01 (or 2.401GHz.)
The DB-1 Receiver/Motor Unit (Fig. 2) mounts up to your camera’s rod support system. The Standard Lenzhound system is designed to control the manual focus ring on a camera lens by means of a 6mm drive belt. Four standard size belts are available to accommodate an array of lenses.
The Main Focus Knob (002) controls rotation of the motor after being calibrated to the close and far focus points of the lens. Calibration mode is entered on power-up of the RTX-1 or, to re-enter calibration after normal operation, by holding down the Rotary Encoder Button (006 ) for three seconds.
- This system will work with most DSLR lenses that have a manual lens ring.
- For single user operation, an optional thumbwheel extension is available.
- A 32-pitch gear system (Cine-standard System) is also available
Mount Motor Unit on the Camera
Slide the Rod Mount Clamp (102) onto your camera’s standard rod system and secure the clamp. The DB-1 Pulley (104) must be properly aligned with the lens ring you want to control. Place the drive belt around the lens and pulley. Tension the belt to get approximately 5 mm of deflection when pressing lightly with your finger.
NOTE: Power up both the Transmitter and Receiver before tensioning belt.
Battery Installation and Connection
RTX-1 Remote Transmitter
Open the battery hatch on the back side of the Lenzhound controller unit and install four AAA batteries. Flip the power switch (010) to on. The pwr LED (009) signals that the unit is powered on.
DB-1 Motor/Receiver Unit
Plug one end of the DC power cable into the power Jack on the DB-1 and the other into the 12V battery (optional accessory) or another compatible 12VDC power source on your camera rig. Securely attach the 12-Volt Lithium battery pack to your camera rig. We recommend a hook and loop style (i.e. Velcro) strap system but there are a number of options available for the indie filmmaker. Turn the power switch on. Allow approximately 8 seconds for each unit to boot up.
NOTE: Test that the motor responds to movement of the encoder knob and then tighten drive belt.
Calibrating the Lenzhound
Calibration is achieved by moving the motor with the rotary encoder to set the close and far range limits of the lens.
- Controller Firmware v1.0.0 (Unit shipped before 6/30/15)
On completion of powerup, the encoder LED will illuminate a steady RED indicating calibration is active. All other motor control is overridden while in this state.
- Controller Firmware v1.0.2 - v1.0.5 (Unit shipped after 6/30/15)
New out of the box, a small range of motion has been pre-calibrated by default. To calibrate to your particular lens press and hold the encoder for 2 seconds until the encoder flashes green and then turns solid red to indicate the first end-position is ready to be set.
For all versions:
To set the first end-position of the lens, dial the encoder knob until the desired motor position is achieved and press the encoder button. The encoder will flash green and then red indicating the second end-point can be entered. Again dial the encoder knob until the opposite end-position is obtained and again press the button. The encoder will flash green and the system exits the calibration state. During calibration, the three positionMode Switch (007 in Fig. 2) functions as a speed multiplier, allowing the motor to be moved faster or slower with the encoder knob.
Successful calibration effectively maps the desired lens movement range to the full range of the main focus knob. If desired, the motor direction may be reversed, relative to the main knob direction, by calibrating the near and far focus points in reverse order.
To re-enter calibration mode press and hold the encoder for 2 seconds until the encoder flashes green and turns solid red to indicate the first position is ready to be set.
Free Run
After calibration, operation of the lens ring with the main focus knob is achieved by placing the unit in Free Run mode. Flip the mode toggle switch to the right, i.e. the Run position.
Basic follow focus operation lives and breathes in free run. Pulling focus is an art and a science. A remote video monitor is considered essential, but in the days before video it was often accomplished using the lens markings alone. A good focus puller is good at judging distances and will use all methods available for assistance.
The Marking Disk (001) can be marked with grease pencil or white-board markers. It is useful for noting both a specific mark that an on-camera subject will hit on the set and/or, for the full range of transcribed distance markings from the barrel of the lens.
While in Free Run mode, up to four specific focus knob positions may be stored (set) in memory by pressing any of the four Set/Recall Buttons (004).
Playback
A stored memory position that is "Set" in Run mode, may be recalled in Playback Mode. In this mode any of the four recall buttons can be pressed in any order and the motor will immediately move to that position.
The motor speed can be adjusted in playback mode by dialing the encoder knob to the left or right. The bank of 4 LEDs on the top of the controller help provide feedback as you dial speed settings. The far left LED (red) will light to signal you have reached the slowest playback speed, and the far right LED (green) shows you have reached the fastest playback speed.
The speed may be changed either before pressing a recall button or while the motor is in motion. The motor speed responds in real time. When entering playback mode, the encoder LED illuminates yellow, indicating playback speed is mid-way at 50%. The motor speed is adjustable from 1% to 100% of the normal speed established in firmware. The firmware may be updated by the user. Check out our Downloads section.
Z-Mode
Z-Mode mode is an alternate to Free Run mode which allows for real time control over your motors maximum velocity.
Like in Playback mode, the motor speed can be adjusted by dialing the encoder knob to the left or right. The bank of 4 LEDs on the top of the controller help provide feedback as you dial speed settings. The far left LED (red) will light to signal you have reached the slowest speed, and the far right LED (green) shows you have reached the fastest speed.
This is extremely advantageous for creating smooth ramps to your focus points or when using heavier lenses/stiffer lenses where the maximum velocity may need to be slowed down to prevent the motor from skipping steps.
While in Z-Mode the memory Set/Recall buttons are disabled.
Motor Power Settings
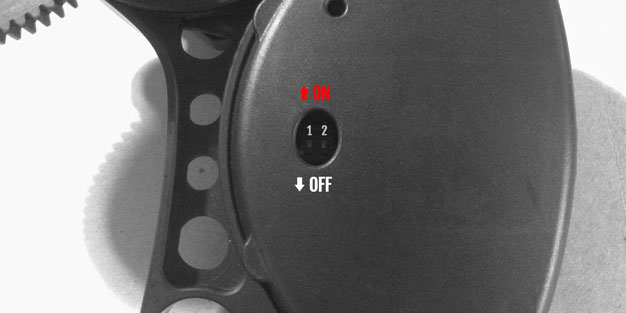
The DIP switches are accessed through the larger hole in the receiver box face and will attenuate power to the motor. Lower power provides smoother, quieter operation but sacrifices torque in the process. We recommend starting at full power (switch one and two off) and turning down if you need to.
| Power Level | Full | Medium | Low | Very Low |
| SW1 | off | on | off | on |
| SW2 | off | off | on | on |
More than Just a Follow Focus
System settings such as speed, acceleration, resolution and channel may be adjusted via command line functions (requires a USB Connection) or within the Arduino Integrated Development Environment (IDE). (See Power User section)
You can explore the parameters and experiment on your own to create complex moves, adjust the speed profile curves or change the timing parameters. This would allow you, for example, to enable very slow, time-lapse type of functionality. Or maybe you have heavier cinema lenses you’d like to control.
The Lenzhound System employs a stepper motor to control the lens. Steppers are known for their torque at low speeds and for holding torque. Most DSLR lenses are very light and can be moved very quickly with the Lenzhound. Moving a larger, heavier, cinema-style lens may require a slight reduction in speed and the console is the secret to making these changes.
The open source nature of the firmware allows you to change the parameters in the default modes (Freerun and Playback) if you choose, but Z-mode is designed to enable access to that customization at the flip of a switch while preserving the default functionality of the other two modes.